The Joy of Color Filters…Or A Pain In The Glass? (Premium)
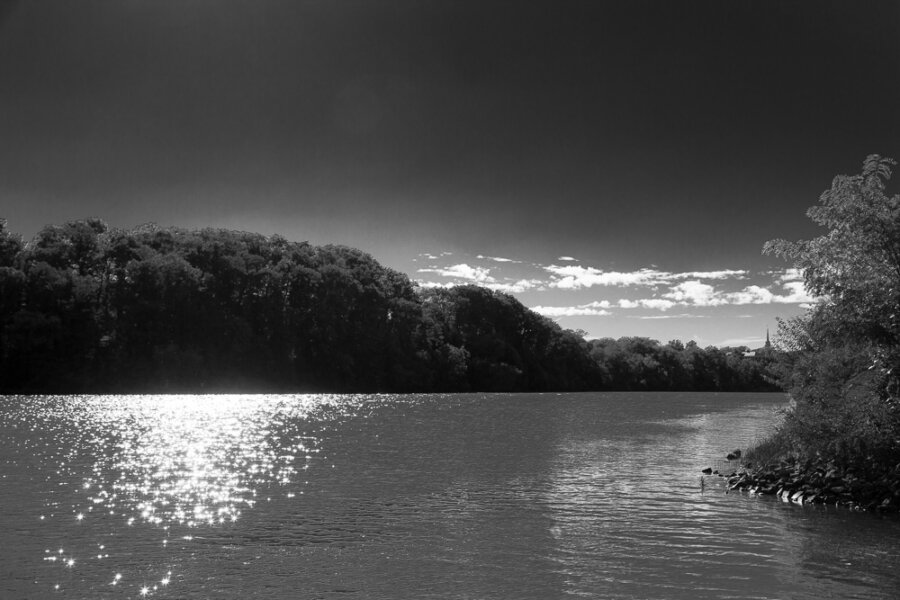
Straight out of camera: Shot in black and white, through a deep red filter, no post-processing.
In this digital age, it’s easy to emulate the effect of a color filter on a digital image in post-processing, especially when you start with a color RAW file. Furthermore, most digital cameras have a mode that emulates the effects of different color filters when shooting black and white. But some folks still use glass filters. Why? Let’s find out if glass or digital filtering is best for you.
What do color filters do to a black-and-white image? They change the relative tonality of the different colors in the image. A specific colored filter will lighten the shade of anything in the image that shares that color. So, if you’re shooting foliage and have a green filter, the green leaves and grass will be rendered somewhat lighter than in a picture shot without a filter.
Conversely, if something in the image is opposite the filter color on a color wheel, that item or area of the image will be rendered darker. The classic example is a blue sky, which can be turned almost black when using a red filter, a deep gray with an orange filter, and a not-as-deep gray with a yellow filter. This is a technique that has been used effectively by Ansel Adams and many others.
Serious post-processing: RAW original, converted to black and white, with 100% yellow and green sliders and -100% blue slider applied in Photoshop.
You’ve Got Choices
Back in the days when film was your only choice, if you wanted the full range of tonal control via color filters, you needed a bag full of glass. But now, with digital as an option, there are three ways to apply the effect of color filtration on black-and-white images:
1. Glass filters with film or digital B&W
2. In-Camera Filtered B&W mode
3. Color sliders in post-production
Each of these approaches has its plusses and minuses. Let’s take a look at each method.
Glass filters
If you’re shooting film, glass filters are your only choice. Thanks to diminishing demand, the price of sets of glass color filters has dropped to the point where you could buy a set of 12-20 no-name filters in different colors and intensities for between $25 and 50 on eBay or Amazon. At this price, the quality will be good enough for experimentation; once you’ve settled on specific filters that you want to invest in for quality, consider B+W, Hoya or Tiffen for higher-quality, coated glass that will give you sharper results.

Black and white original, no filter.

Black and white with green glass filter. Note how the green foliage is a little lighter compared to the rest of the scene.

Black and white with red glass filter. The blue sky is rendered a darker, more dramatic shade of grey.
Plusses:
1. Blocks light: A physical glass filter, depending on its intensity, could block between 1/3 and 3 stops of light. This can be beneficial when you are looking to slow down exposure in order to capture silky flowing water.
2. Consistent results: Since there are no adjustments or intermediate steps, the effect of your filter remains consistent. Get to know the characteristics of a color filter and you’ll better be able to previsualize your final result.
3. It’s a big time-saver: While post-production allows more flexibility, there’s something to be said for creating a complete photo in camera with no need to spend time on it after the fact.
Minuses:
1. Blocks light: If you really want all the light you can get, glass might not be right for you.
2. Not adjustable: You’re stuck with the shade and intensity and if you don’t have the exact color filter you need, you’re stuck.
In-Camera Filters in B&W Mode
Most digital cameras offer a limited number of color filter effects that can be applied in B&W (or Monochrome) mode. Depending on the brand or model you can end up with three choices, five or six, or a combination of colors and intensities.
Tip: When shooting B&W with color filter effects, it’s a good idea to capture in RAW + JPEG simultaneously, if your camera allows it. The JPEG image will be the straight-out-of-camera black and white image, while the RAW file provides you with a color back-up file, in case you decide to re-do the effect in post-production.

In-camera virtual filters: First, the original color scene. All photos in this scene shot with Fujifilm X-Pro 1 and 12mm Zeiss lens.

Straight out of camera, no filter, not very exciting.

Virtual blue filter doesn’t really do much for this shot. This particular camera did not offer a green option, which might have been more useful here.

Virtual red filter adds a touch of drama to the sky here.
Plusses:
1. The effect has no effect on exposure: There’s no glass, no darkening effect, and therefore, your aperture and shutter speed remain the same. There’s something to be said for consistency.
2. You can preview the effect on screen. The good news here is that, as with the glass filter option, you can end up with a straight-out-of-camera image that needs nothing else after the fact.
3. No additional physical filters needed. Digital filters save you money.
Minuses:
1. Limited selection in most cameras: While glass filters are available in a wide variety of colors and intensities, most in-camera filter settings are limited. For example, the Fujifilm X-Pro 1 offers Red, Yellow and Green filters, nothing more, while Canon DSLRs tend to have Red, Orange, Yellow, Green and Blue. The Olympus Pen F has more choices with intermediate adjustment settings. In other words, the variety of choices is very brand-specific.
Color Sliders in Post
Finally, you can simply capture your digital image in color (RAW is the recommended choice here), convert it to black-and-white in Photoshop or Lightroom, and then use the color filter slider tool to get the effect you want.

Slider special: Just for fun, I took the same color RAW original file that was used in the above sequence and used color sliders to get the best possible image. While there’s something to be said for the convenience of getting it right in camera, there are a lot more possibilities when you bring a well-exposed RAW image into post-process and use the B&W sliders. In this case, getting this image to look like this only took me about two minutes.
Plusses:
1. Unlimited choices: You can apply plus or minus 100% of any color, or any step in between.
2. Add or subtract multiple colors in same image. In the above example, I used the green, yellow and blue sliders to create the images dramatic tones.
3. You can experiment. You can move the slider and watch the effect on your computer. Pretty nifty!
Minuses
1. Extreme application can deteriorate image quality: This is especially true when shooting at higher ISOs, since some filters can exaggerate graininess.
2. All that experimentation can turn into a time sink. If you aren’t sure of the effect you are looking for, you can end up wasting a lot of time playing. On the other hand, it will only be a fraction of the time (and material) it would take to do the same kind of experimentation in a chemical darkroom.
Bottom line? Unless you need the exposure-reducing properties of glass filters, it seems like post-processing RAW images converted to black and white is the best way to go, with in-camera virtual filters coming in second. Your mileage may vary.