5 Tips For Great Portraits with Fujifilm’s Acros Simulation (Premium)
But those new to this latest generation of X-Series bodies may be wondering how to get the most out of the Acros film simulation, specifically when it comes to portraiture. In this piece, we have several tips and tricks for getting the most out of the Acros film simulation in regards to getting pleasing black and white portraits with an authentic film look.
Tip #1: Choose A Color Filter Option

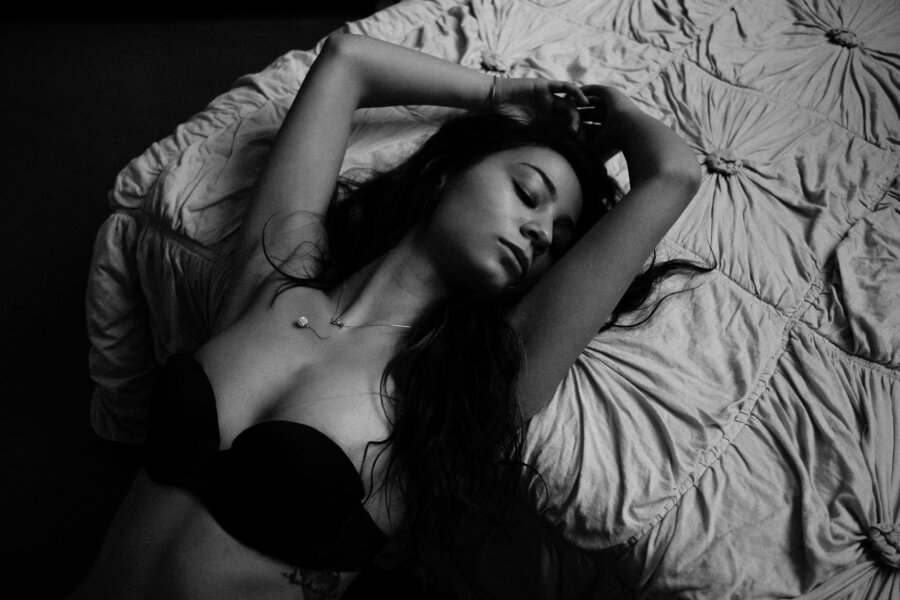
Image by www.afterhoursboudoir.com
Many photographers stay away from black and white color filters as they don’t really understand what is going on, but one of the biggest ways to take your black and white portraits to another level is to pick a color filter option in the menu that fits your subject or your scene.
In the case of shooting portraits, one of this writer’s favorite options is the green color filter, found on the menu as “Acros+G” because of the pleasing effect that it has on skin tones in most situations. Sometimes the effect is more pronounced than others, and sometimes it is very subtle, but it’s one of those little things that can add up to taking your image to another level.
Tip #2: Play With Your Tone Settings To Dial In Your Desired Look
Another great tool on these Fujifilm cameras is the ability to play with your tone settings. In the case of shooting portraits with the Acros film simulation, we have found the default tones to be rather bland and low contrast. We prefer a slightly higher contrast look with this film simulation for portraits.
You have four options available to you when shooting with the Acros film simulation: Highlight Tone, Shadow Tone, Sharpness, & Noise Reduction. There is also a color setting that is grayed out due to this being a black and white film simulation.
If you are looking for a higher contrast look, as we do when we shoot portraits, than you want to bump up both your shadows and highlights to taste. We have found that in most situations, we like to the look of around Highlights +3 and Shadows +2, with Sharpness at +2 and Noise Reduction at -2.
However, this is entirely subjective, you may like the Acros look right out of the box, or maybe with even less contrast, in which case you can tweak the tone settings in the reverse to get your desired look.
Tip #3: Backlight is your friend
When shooting for a darker, higher contrast look with the Acros film simulation one of your best tools when shooting with natural light can be to backlight the image. This allows you to underexpose your highlights, giving you a nice and soft look, all while keeping those shadows nice and dark.
Usually, this could result in very dark shadows and an image that most would see as too contrasty. But thanks to the Acros simulations natural built in low contrast nature, this actually levels the shadows out and even when though you would think they are going to be too dark, they end up right in that perfect zone of being dark enough that you get the desired contrast, but bright enough that you can see detail in those shadows.
#4: Limit distractions of light
Since shooting black and white simplifies your scene by eliminating color distractions, the one real big distraction that is easy to overlook is having overbearing background highlights. This could be a giant blown out window behind your subject, or a bright light street light behind them if you are outside.

Photo by Anthony Thurston – https://anthonythurston.com
This is sort of a general rule anyway, but this is especially the case when shooting with the Acros setting. This will pull the attention of the viewers away from the subject and to that highlight area. The only exception to this is if your entire background is a highlight, at which time the eye will be drawn to your subject.
#5: Shoot with the Acros setting turned on, See what you get
The glory of shooting with a mirrorless system like Fujifilm is that you can see what you are capturing in real time through your EVF. In the case of the Acros setting, you can turn this on and your EVF will show you the black and white.
This is key to getting your desired look from the camera. Make sure to have the Acros setting chosen as your desired look when shooting for black and white. It is true you can always change the RAW file later, but getting the best results from the Acros requires seeing it as you go about shooting your session, and this is not something that you can obviously do after the fact.
Hopefully, these tips have been helpful for those of you who have been looking to get better results out of your Acros film simulation portraits. It is not a hard simulation to get great results out of as long as you take the time to understand what it is doing to your images and how to work with that to create the look that you are trying to create. Enjoy!
